You can master the latest information, new product , exhibition, promotion, etc
Vaping has evolved from a simple alternative to smoking into a personalized experience, and one of the most exciting aspects is creating your own custom vape flavors. Imagine sipping on a blend that perfectly matches your taste buds—whether it’s a zesty citrus burst, a creamy dessert delight, or a bold fusion of fruits. Crafting your own e-liquid not only lets you tailor every note but also gives you control over ingredients, strength, and consistency. In this comprehensive guide, we’ll walk you through the entire process, from gathering supplies to mastering flavor combinations, so you can start blending like a pro.
Why Customize Your Vape Flavors?
Before diving into the how-to, let’s explore why DIY vape flavoring has become a favorite among enthusiasts. First, it’s a cost-effective alternative to store-bought e-liquids. Over time, mixing your own can save you money, especially if you vape regularly. Second, you get full transparency over what goes into your juice. No more guessing about mysterious additives—you choose high-quality, food-grade ingredients. Third, and perhaps most importantly, it’s a creative outlet. You can experiment with endless flavor profiles, adjusting sweetness, intensity, and complexity to suit your mood or season. Whether you crave a cozy winter spice in December or a refreshing watermelon mint in summer, the possibilities are endless.
Essential Tools and Ingredients
To start crafting your custom vape flavors, you’ll need to gather a few key tools and ingredients. Let’s break them down:
Ingredients:
Base Liquids (VG/PG): The foundation of any e-liquid, these two components determine thickness, vapor production, and throat hit.
Vegetable Glycerin (VG): A thick, sweet liquid that produces large clouds. It’s ideal for cloud chasers but can make flavors less intense.
Propylene Glycol (PG): A thinner liquid that carries flavor more effectively and delivers a stronger throat hit. Most blends use a mix (e.g., 70% VG/30% PG for balance).
Nicotine (Optional): If you prefer nicotine, choose a high-quality, diluted nicotine solution (often in PG). Start with lower strengths (3-6mg) if you’re new.
Flavor Concentrates: The star of the show! Opt for food-grade, vape-safe flavorings from reputable brands. These come in single notes (e.g., strawberry, vanilla) or pre-mixed blends.
Distilled Water (Optional): A few drops can thin thick VG-based juices, making them easier to vape in certain devices.
Tools:
Syringes or Pipettes: For precise measuring (1ml, 5ml, and 10ml sizes work best).
Mixing Bottles: Glass or plastic bottles with secure lids (30ml to 100ml sizes) for blending and storing.
Gloves and Safety Glasses: Protect your skin and eyes from nicotine and concentrated flavors.
Labels: To note flavor combinations, nicotine strength, and mix date (critical for tracking your recipes!).
Scale (Optional but Recommended): For more accurate measurements, especially when working with small flavor amounts.
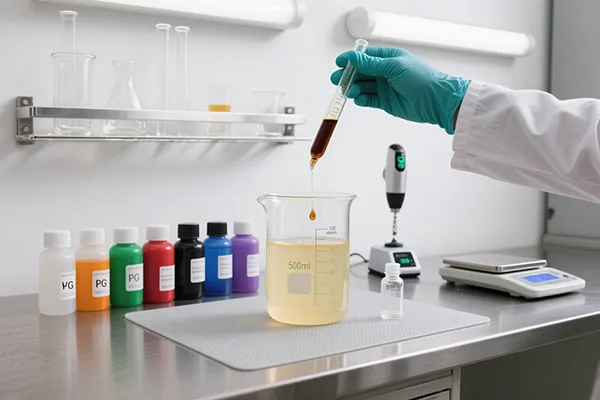
Step-by-Step: Mixing Your Custom Vape Flavor
Now that you have your supplies, let’s walk through the mixing process step by step. We’ll start with a basic 30ml batch—perfect for beginners.
Step 1: Decide on Your Ratio
First, choose your VG/PG ratio. A common starting point is 70% VG / 30% PG for a balance of clouds and flavor. For reference:
30ml total = 21ml VG + 9ml PG (before adding flavor/nicotine).
Step 2: Add Nicotine (If Desired)
Nicotine is measured by strength (mg/ml). For a 30ml batch with 3mg strength:
Use 1.5ml of 60mg nicotine (since 1.5ml x 60mg = 90mg total; 90mg / 30ml = 3mg/ml).
Subtract the nicotine volume from your PG amount. In this case: 9ml PG - 1.5ml nicotine = 7.5ml PG left.
Step 3: Choose and Measure Flavors
This is where creativity shines! Start with 10-15% flavor concentration for most recipes (3-4.5ml for 30ml).
Example: 2ml strawberry + 1ml vanilla + 0.5ml cream = 3.5ml total flavor (11.7% concentration).
Pro Tip: Less is often more! Strong flavors like mint or cinnamon can overpower a blend—start with 1-2% and adjust.
Step 4: Mix and Shake
Combine VG, PG (minus nicotine), nicotine (if using), and flavors in your mixing bottle. Seal tightly and shake vigorously for 1-2 minutes to ensure everything blends.
Mastering Flavor Combinations
The art of custom vaping lies in balancing flavors. Here are some tried-and-true combinations to inspire you:
Fruity Fresh: 5% mango + 3% pineapple + 1% coconut (tropical paradise).
Dessert Dream: 4% vanilla custard + 2% caramel + 1% butterscotch (rich and indulgent).
Refreshing Menthol: 3% watermelon + 2% mint + 1% lime (cool and crisp).
Pro Tip: Keep a flavor journal! Note ratios, strengths, and tasting notes—this helps you replicate successes or tweak misses.
Steeping: Letting Flavors Mature
After mixing, most e-liquids benefit from steeping—a resting period to let flavors meld. Here’s how:
Method 1: Seal the bottle and let it sit in a dark, cool place for 3-7 days. Shake daily.
Method 2: Speed up steeping by placing the bottle in a bowl of warm (not hot) water for 10-15 minutes, shaking occasionally.
Steeping is optional but recommended for complex flavors—many vapers find the wait worthwhile!
Safety First
Always work in a well-ventilated area.
Keep nicotine and flavorings out of reach of children and pets.
Wear gloves when handling concentrated nicotine (it can irritate skin).
Store ingredients in dark, airtight containers away from heat and light.
Final Thoughts
Crafting your own custom vape flavors is a rewarding journey that combines science and creativity. With the right tools, a little patience, and a sense of adventure, you’ll soon be blending juices that outshine store-bought options. Remember: practice makes perfect—don’t be afraid to experiment, learn from mistakes, and share your creations with fellow vapers.
Ready to start? Gather your supplies, pick a flavor idea, and let the mixing begin!
Happy vaping, and may your clouds be fluffy and your flavors unforgettable!


